|
HOME | FREE BEGINNING GUITAR LESSONS | FREE VIDEO GUITAR LESSONS BLUEGRASS GUITAR 101 EBOOK | FREE GUITAR TABS | FREE GUITAR CHORD CHARTS |
||||
|
LINKS TO MY OTHER FREE LESSON SITES: • Mandolin ©2016 Bradley Laird
|
FREE
GUITAR LESSONS - by Bradley Laird
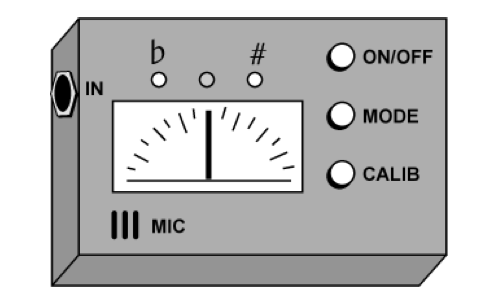
LESSON 2 TUNING YOUR GUITAR Each and every time you play your guitar you will need to check your tuning. There is no such thing as a guitar that stays in tune indefinately. Always check your tuning before you play and from time to time as you play. Learning to tune a guitar by ear takes some practice but with the advent of electronic tuning devices it is almost becoming a lost art. However, rather than battle the tide of so-called progress, I will explain how to tune the guitar using an electronic tuner. Electronic tuners are simply devices that "listen" to the sound of your instrument and display the pitch on some sort of visual readout. The display might be a set of LEDs, a liquid crystal display or an analog meter with a needle. But, bear in mind that YOU are the real tuner. The device just suggests when you should stop turning the tuning pegs. That's all it does.
For bluegrass music, the guitar is almost universally tuned to "standard guitar tuning" which means the strings are tuned to the following notes: I
should mention that when you tighten a string it produces a higher musical
pitch. Looser produces a lower note.
Take a close look
at the tuning machines on the peghead of your guitar and notice
how the strings are wound around the peg. Play a string and turn one of the knobs
so that the
pitch lowers slightly. On most steel-string
guitars a counter-clockwise turn of the knob when viewed from the side of the knob
will raise the pitch of the string so go the other way. Always play the
string
you are tuning so you can hear if you are raising or lowering the pitch and
so you can tell if you are turning the correct peg. Failure to
be aware of this, especially in the early stages, will break strings by
cranking
away on the wrong peg or turning the wrong direction. In any event, play the string, and while it is still ringing, turn the knob slightly. Hear the pitch change? Did it go higher or lower? Take a few minutes and lower the pitch of a string a bit and bring it back up to where it was. Don’t make big, radical movements of the knob. Just enough to hear the pitch change. Do that a few times. (If you find it impossible to tell if the pitch is raising or lowering you might want to consider taking up watercolor painting instead. But, I think you will get it eventually so hang in there!) OK, now that you have the feel of the tuning pegs let's do it the easy way. Grab your electronic tuning machine and turn it on. Play the 6th string. (That is the big fat one nearest the top of the guitar.) The machine will most likely read "E" and give some indication of being "flat" or "sharp" of an E note. If the display shows an E, which is the correct note for the 6th string, you are on the right track. Now look for whatever tells you flat or sharp on your device. Flat (-) means the pitch is too low and the string is too slack. Sharp (+) means the pitch is too high and the string is too tight. Either tighten or loosen the string until the device is centered. On some tuners you are looking at a needle or a representation of a needle. Just center the needle. If your device uses LEDs the usual design is to illuminate the center LED only. This center LED is usually a different color from the rest. When you are satisfied with the tuning of the 6th string do the same with the 5th string. It is tuned to an A. Continue adjusting the tension of all the strings until you are satisfied that the electronic device thinks you are "in tune." Look back at the chart for the correct notes for each string of the guitar. If you are not seeing any of those note names it means you are waaaaaaaay out of tune. Keep reading... For you players who already are well-versed in some other guitar styles this information is nothing you need. But, for a beginner it is extremely important. There are few things that will hurt the perception of your playing ability as much as playing out of tune. Here is a tip that will help you tune the guitar whether you use an electronic device or some other method: Play each string with
a good loud pick stroke and let it ring. Then check the tuning with a quieter
note. Friction can inhibit the string’s ability to slide smoothly
over the bridge and through the nut slots. This can cause unequal tension
in the non-sounding segments of the string. When a string goes out of tune
after you play a while what probably happened is that the unequal tension
equalized! In other words, tune the note, play it hard and try to knock it
out of tune. If it held, good! If it went flat, bring it up while
playing it hard and check it softly again. Better that you knock it out
of tune now than to have it go out in the middle of a performance. What to do if the guitar
is so out of tune that the tuner is reading the wrong note...
A
About That Calibrate Button Most tuners have the ridiculous ability to be calibrated to a variety of "standard" pitches. Just know this for now: 440 cycles per second for an A note IS THE STANDARD in the modern world. Every time you punch that calibrate button, intentionally or accidentally, you will set the tuner to 435, 436, 437, etc. and you will end up "in tune" with yourself, but "out of tune" with the rest of the world. Without a lot of excess explanation, just be sure you keep your tuning device set to A440. Same goes for those "b", "bb" and "bbb" things that some tuners do to get metal heads in their preferred slack tuning. Read the leaflet manual that came with your tuner, keep 'er on 440, don't have any "bbb" showing in the display and call your guitar playing buddy to come over with a six-pack and explain it all again. Now, if you are in tune just hop on over to Lesson 3 and I am going to teach you how to play basic bluegrass rhythm.
| |||